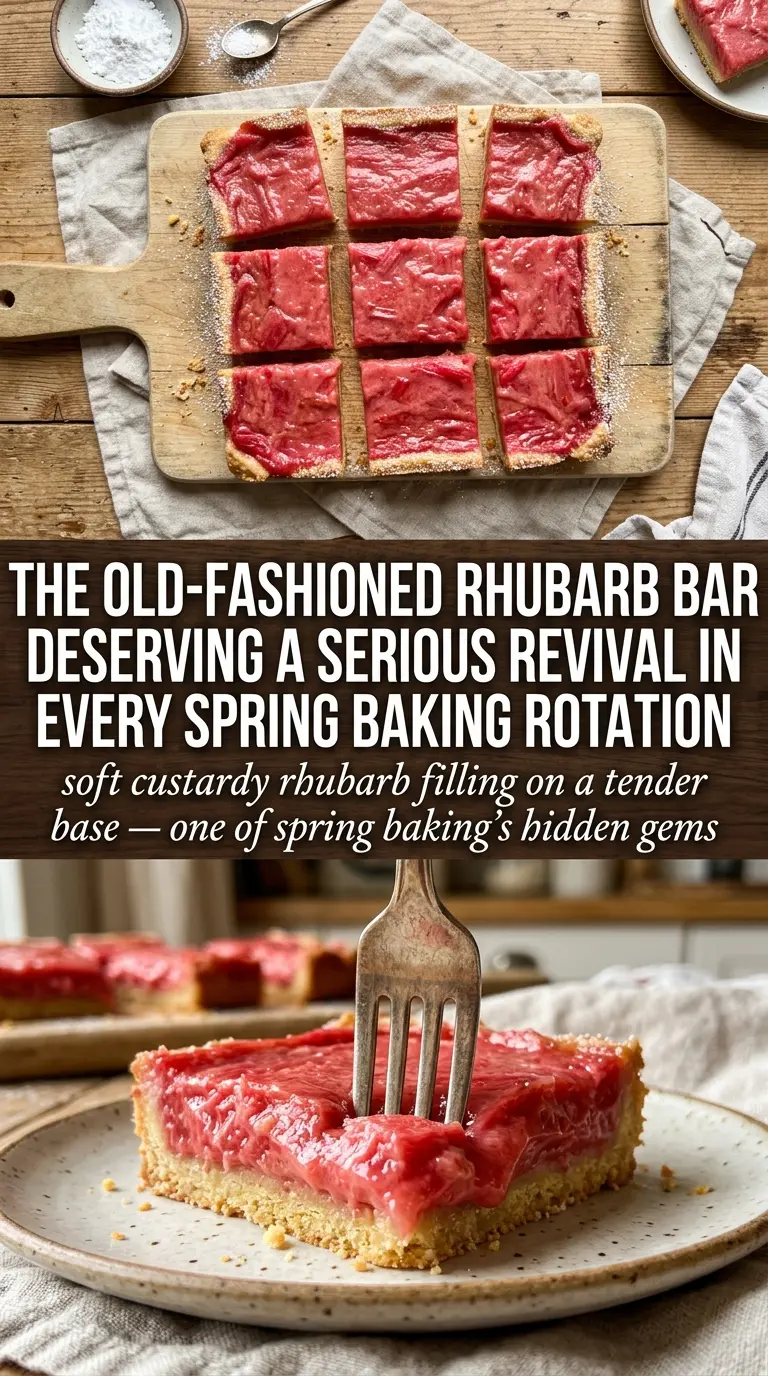
Rhubarb pudding bars hit that sweet spot between nostalgic and smart: a buttery shortbread crust that stays crisp, a cool vanilla layer that cuts the tartness, and a glossy rhubarb topping that sets up into neat slices instead of sliding apart on the plate. The three layers give you a dessert that feels a little special without asking for much more than a pan and a pot.
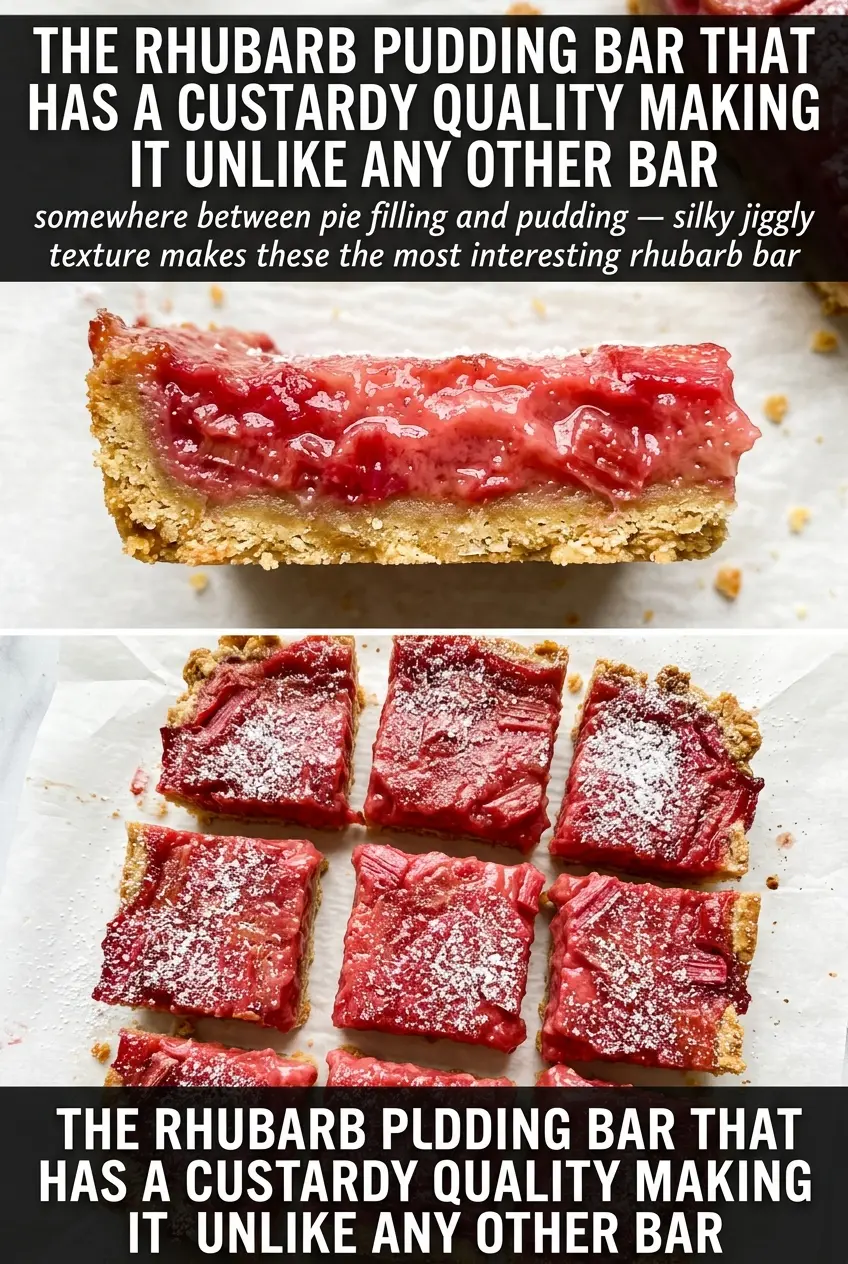
The part that makes these bars work is patience between layers. The crust needs to cool completely before the pudding goes on, or the filling can turn loose and the base softens too fast. The rhubarb topping also has to be cooked long enough for the cornstarch to thicken fully; if it still looks thin in the pan, it will stay thin after chilling.
Below you’ll find the small details that keep the layers distinct, plus the best way to cut the bars cleanly once they’ve chilled. If you’ve ever had a layered dessert slump on the first slice, this version is built to avoid that.
The crust stayed crisp under the pudding and the rhubarb layer set beautifully after chilling. I was worried the filling would be runny, but the bars cut cleanly and tasted even better the next day.
Pin these rhubarb pudding bars for the layered dessert with a crisp shortbread base and clean, creamy slices.
The Reason the Layers Stay Separate Instead of Blurring Together
These bars depend on temperature control more than fancy technique. The crust goes in first and cools all the way down before the pudding is spread over it, which keeps the filling from seeping into the shortbread and turning it sandy. The rhubarb layer is cooked separately, then cooled just enough so it won’t melt the pudding when it lands on top.
The other thing that matters is thickness. Each layer needs to be set enough to hold the next one, but not overcooked until rubbery or dry. The pudding should spread like a thick custard, the rhubarb should mound slightly on a spoon, and the finished bars need that full chill so the knife can cut through without dragging the layers.
What Each Ingredient Is Actually Doing in Rhubarb Pudding Bars
- Protein (quality, proper thickness) — Good quality protein tastes better. Even thickness ensures even cooking.
- Seasoning (bold, distributed throughout) — Don’t be shy with salt and pepper. Quality seasoning elevates everything.
- Oil or fat (protective and flavorful) — The fat helps develop crust and carries flavors. Use generously.
- Heat management (appropriate temperature for the protein) — Too high and the outside burns before the inside cooks. Too low and it steams.
- Technique (sear, then finish based on thickness) — Proper technique creates flavor. Sear for crust, then cook through gently.
- Aromatics and seasonings (garlic, herbs, spices) — These add complexity and depth. Distribute them throughout the cooking process.
- Resting time (let it rest before serving) — Resting allows juices to reabsorb. This keeps the protein moist and tender.
- Optional: finishing sauce or glaze — A light sauce adds richness without overwhelming. Apply at the very end.
What the Cornstarch and Pudding Are Really Doing Here
- Instant vanilla pudding — This gives you a stable, creamy middle that sets without baking. Cook-and-serve pudding won’t give the same quick set or the same tidy slice, so stick with instant here.
- Cold butter — Cold butter is what makes the crust tender and sandy in the best way. If it softens before baking, the base turns dense instead of crumbly, so cut it in straight from the fridge.
- Fresh rhubarb — Fresh rhubarb gives the topping its tart bite and bright color. Frozen rhubarb can work, but it releases more water, so cook it a little longer and don’t skip the cornstarch step.
- Cornstarch — This is what turns the rhubarb from a loose compote into a topping that sits on the bars. Mix it with a splash of water before adding it to the pan so it doesn’t clump into little gummy bits.
Building the Bars in the Right Order
Pressing and Baking the Crust
Mix the flour and powdered sugar first, then cut in the cold butter until the mixture looks like damp sand with a few pea-size pieces left. Press it firmly and evenly into the parchment-lined pan so the crust bakes into one steady layer instead of crumbling when you slice the bars. Bake until the edges are golden and the center looks set, not pale and doughy. If the crust is underbaked, it will soften once the pudding goes on.
Spreading the Pudding Layer
Whisk the instant pudding with cold milk until it thickens, then spread it over the cooled crust right away. Work gently so you don’t tear the base; an offset spatula or the back of a spoon helps glide the pudding across without pulling crumbs into it. If the crust is even a little warm, wait longer. Warm crust is the fastest way to lose that clean two-layer look.
Cooking the Rhubarb Topping Until It Clings to the Spoon
Simmer the diced rhubarb with sugar and water until the pieces soften and start breaking down, then stir in the cornstarch slurry and cook until the liquid turns glossy and thick. This is the stage that people rush, and it’s the one that decides whether the bars hold. The topping should look spoonable, not watery; if it pours like juice, keep cooking for another minute or two. Let it cool slightly before spreading so it doesn’t melt the pudding beneath it.
Chilling and Cutting Clean Squares
Refrigerate the assembled bars for at least two hours, but longer is even better if you want neat edges. Use a sharp knife and wipe it between cuts so the rhubarb layer doesn’t drag across the top. A dollop of whipped cream takes the edge off the tart rhubarb and makes the bars feel finished without hiding the layers.
How to Adapt These Bars When Rhubarb Is Not the Only Fruit in the Bowl
Make Them Dairy-Free
Use a plant-based butter for the crust and swap in an unsweetened non-dairy milk that works with instant pudding. The texture stays close, but the crust will be a touch less rich, so bake it until the edges are clearly golden for the best flavor.
Use Frozen Rhubarb Without Ending Up With a Watery Top
Frozen rhubarb can stand in for fresh, but don’t thaw and drain it completely or you’ll lose too much of the tart flavor. Cook it straight from frozen and give the filling an extra minute or two so the extra moisture cooks off before the cornstarch finishes the job.
Make the Bars Less Sweet
If you like a sharper rhubarb finish, reduce the sugar in the topping by a few tablespoons. The bars will taste brighter, but the fruit won’t taste as jammy, so the vanilla pudding layer becomes even more important for balance.
Storage and Reheating
- Refrigerator: Store covered for up to 4 days. The crust softens a little under the pudding, but the bars stay sliceable and taste best cold.
- Freezer: These bars freeze better before slicing than after. Wrap the pan well, freeze until firm, then thaw in the refrigerator; the pudding layer may loosen slightly, but it still works.
- Reheating: These are meant to be served chilled, not reheated. If the bars have been in the fridge a long time, let them sit at room temperature for 10 to 15 minutes before serving so the filling tastes creamier and the rhubarb layer isn’t icy.
Questions I Get Asked About This Recipe
Rhubarb Pudding Bars
Ingredients
Equipment
Method
- Preheat the oven to 350°F and line a 9x13-inch pan with parchment paper, leaving overhang for easy lifting.
- Mix all-purpose flour and powdered sugar, cut in cold butter until the mixture looks crumbly, then press it evenly into the pan.
- Bake for 18-20 minutes at 350°F until the crust turns golden, then cool completely.
- Prepare the instant vanilla pudding according to package directions using cold milk, until thick and smooth.
- Spread the vanilla pudding evenly over the cooled crust, smoothing the top.
- Simmer fresh rhubarb with sugar and water over medium heat until tender.
- Stir cornstarch mixed with a little water into the rhubarb and cook until the mixture thickens.
- Cool the rhubarb mixture slightly, then spread it over the pudding layer.
- Refrigerate for at least 2 hours to chill and set.
- Lift out and cut into bars, then serve chilled with whipped cream.