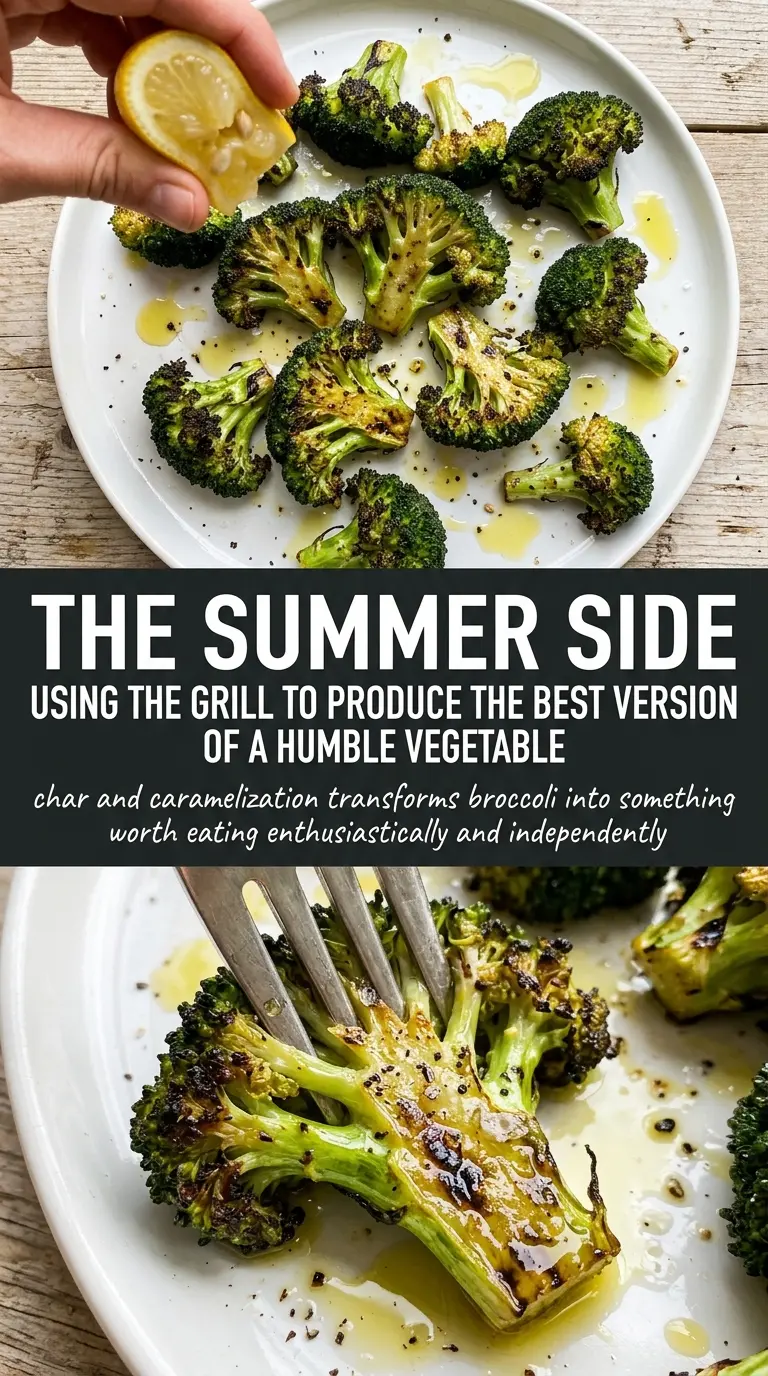
Charred broccoli on the grill turns into something that disappears fast: crisp-edged florets, smoky bits on the outside, and tender stems with enough bite left to keep things interesting. The lemon-garlic coating cuts through the char and keeps every piece tasting bright instead of heavy, which is why this side dish works just as well next to burgers as it does beside chicken, steak, or fish.
The trick is giving the broccoli a head start in boiling water before it hits the grill. That short blanch softens the stems so the grill can focus on building color and flavor instead of trying to cook the whole floret from raw. A good drain matters here, too — wet broccoli steams, and steamed broccoli won’t pick up those dark, crisp edges that make this dish worth making.
Below you’ll find the exact timing that keeps the florets from going limp, plus a few ways to adapt the seasoning when you want it a little richer, spicier, or dairy-free.
The blanching step made all the difference — the broccoli was tender in the middle, got those crisp charred edges, and the lemon garlic coating clung to every floret instead of sliding off.
Save this grilled broccoli for the nights when you want smoky char, lemon-garlic punch, and a side dish that finishes in minutes.
The Shortcut That Keeps Broccoli Crisp Instead of Mushy
Grilled broccoli has one job: pick up smoky flavor without collapsing into soft, wilted pieces. The pre-blanching step is what makes that possible. It gives the stems a head start so the florets can char on the grill before the outside dries out too much, and it keeps the centers tender instead of raw.
The other common mistake is loading on too much liquid before grilling. Lemon juice belongs in the seasoning mix, but the broccoli still needs to be well coated, not drenched. Too much moisture slows browning and creates steam, which is why the broccoli can look cooked but taste flat and soft.
- Blanching — Two minutes in boiling water is enough to soften the thickest parts without taking away the broccoli’s structure. Any longer and you’ll lose the snap that helps it hold up on the grill.
- Drying well — Drain the florets thoroughly after blanching. If they stay wet, the grill marks take longer to form and the broccoli steams instead of searing.
- Medium-high heat — This is hot enough to char the edges fast while keeping the inside tender. If the heat is too low, the broccoli turns limp before it picks up any color.
What the Lemon, Garlic, and Parmesan Are Really Doing Here
- Broccoli — Large florets grill better than tiny ones because they don’t fall through the grates and they keep enough mass to char on the outside before overcooking inside. Cut the stems into similar sizes so everything finishes together.
- Olive oil — This helps the seasoning cling and keeps the florets from sticking to the grill. A good everyday olive oil is fine here; save the fancy finishing oil for another dish.
- Garlic — Fresh minced garlic gives the broccoli its backbone, but it can scorch if it’s clumped on one side. Toss everything evenly so the garlic is distributed across the florets instead of sitting on the hottest spots.
- Lemon zest and juice — Zest carries the bright citrus aroma through the heat, while the juice sharpens the finished dish. If you skip the zest, the broccoli tastes less lively even if the lemon juice is there.
- Parmesan — This adds salt and a little nutty richness at the end. Use it as a finishing touch, not before grilling, or it can melt away and cling to the grates instead of the broccoli.
Building Char Without Burning the Garlic
Blanch the Broccoli First
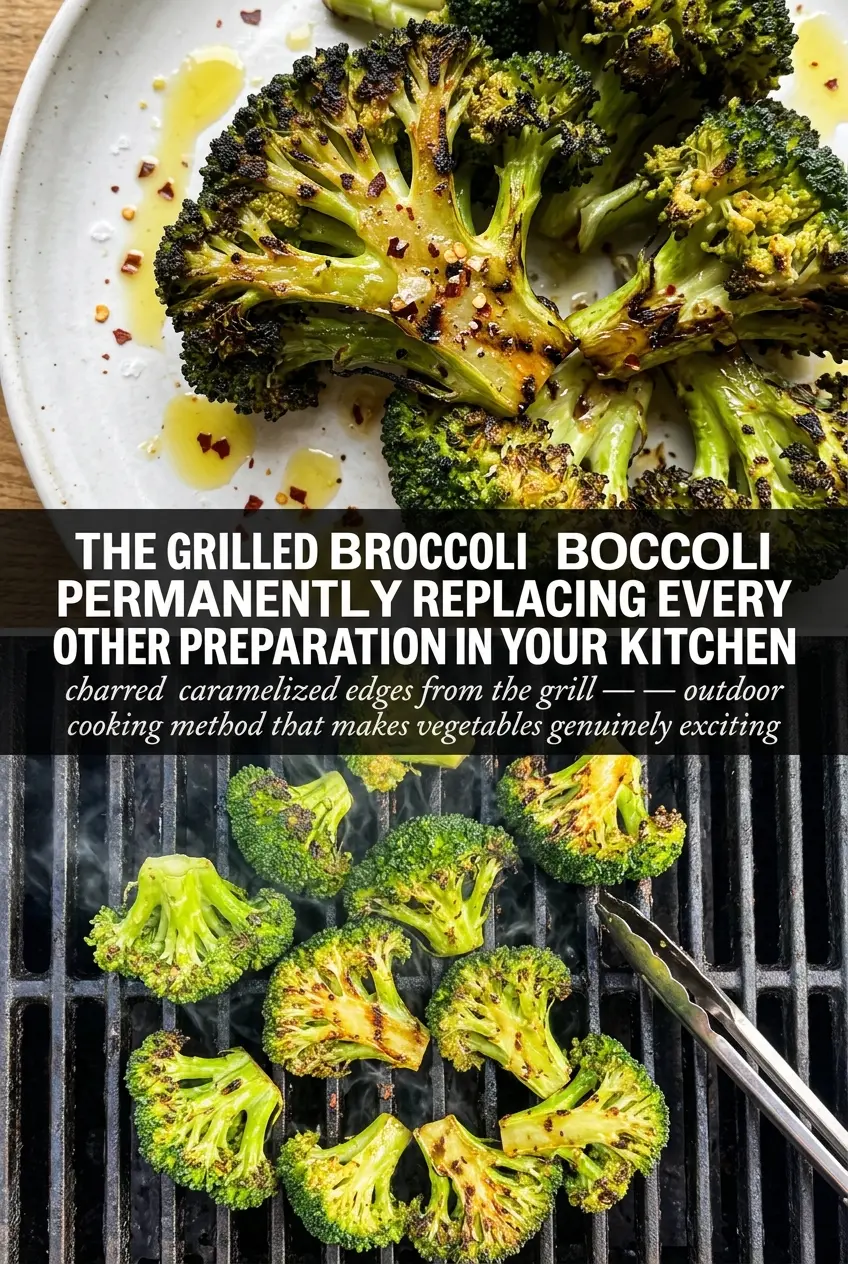
Drop the florets into boiling water for two minutes, then drain them right away. They should look brighter green and still feel firm when you pierce the thick stem with a knife. If you skip this step, the outside can char before the inside gets tender. If you blanch them too long, they’ll go soft and lose their shape on the grill.
Toss for Even Coverage
Mix the broccoli with olive oil, garlic, lemon zest, lemon juice, salt, and pepper while the florets are still warm and dry enough to absorb the seasoning. Every piece should look lightly coated, not slick. If the garlic pools in the bottom of the bowl, keep tossing until it clings evenly. This is the point where too much lemon juice can work against you, so don’t add extra liquid just because the bowl looks dry.
Grill Until the Edges Crisp
Lay the broccoli over medium-high heat and leave it long enough to pick up dark grill marks before turning. You want the outer tips to look crisp and a little frilly, with the stems tender when squeezed gently with tongs. If the florets are sticking hard, give them another minute; they’ll release once the sear forms. Pull them before the garlic turns black, because bitter garlic can take over the whole dish fast.
Finish While It’s Hot
Transfer the broccoli to a platter and add red pepper flakes and Parmesan while it’s still hot enough to soften the cheese slightly. The residual heat wakes up the lemon and helps the seasoning settle into the cracks and charred edges. Serve it right away if you want the crispiest texture, because grilled broccoli loses its snap as it sits.
How to Adapt Grilled Broccoli for Different Tables
Dairy-Free Version
Skip the Parmesan and finish with an extra pinch of salt plus a little more lemon zest. You lose the savory, nutty finish, but the grilled broccoli stays bright and bold.
Spicy Grilled Broccoli
Double the red pepper flakes or add a pinch of crushed chile before grilling. That gives the charred edges a little heat without overpowering the lemon-garlic base.
No-Grill Indoor Version
Roast the broccoli on a sheet pan at high heat, around 450°F, until the edges are browned and the stems are tender. You’ll miss the grill smoke, but the char and texture still come through if the pan isn’t crowded.
Storage and Reheating
- Refrigerator: Store in an airtight container for up to 3 days. The broccoli softens a little, but the flavor stays good.
- Freezer: I don’t recommend freezing this one. The texture turns watery and the char is lost.
- Reheating: Reheat in a hot skillet or a 400°F oven until warmed through. The microwave makes the broccoli limp and dulls the char.
Answers to the Questions Worth Asking
Grilled Broccoli
Ingredients
Equipment
Method
- Bring a pot of water to a boil and blanch broccoli florets for 2 minutes. Look for bright green color and slightly softened stems.
- Drain broccoli well so it doesn’t steam on the grill. Shake in a colander to remove excess water.
- Toss broccoli with olive oil, minced garlic, lemon zest, lemon juice, salt, and pepper. The florets should look glossy and evenly coated.
- Grill broccoli over medium-high heat for 4-5 minutes per side until charred and tender. Watch for dark char marks and crisped edges as it grills.
- Transfer grilled broccoli to a serving platter and sprinkle with red pepper flakes and Parmesan cheese if desired. Serve right away for the best char and texture.