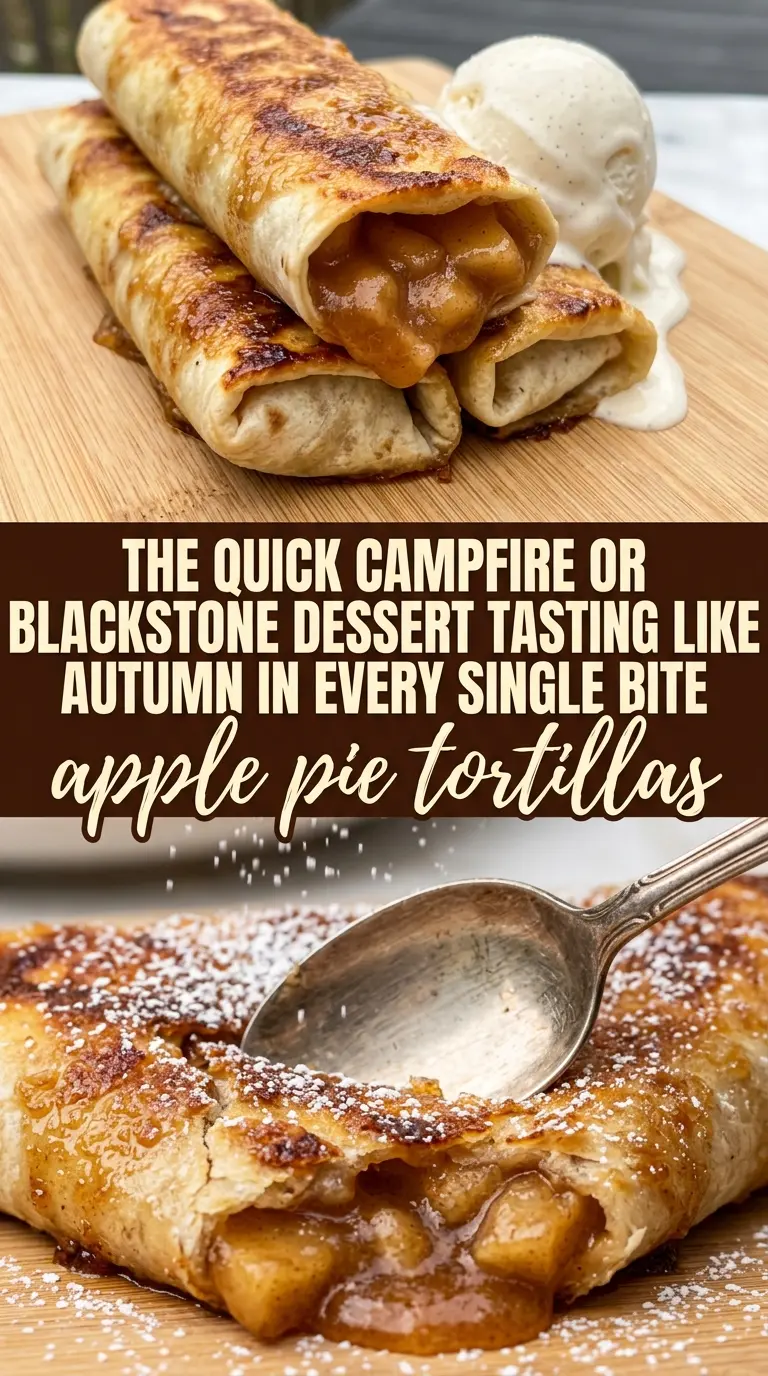
Golden, crisp tortillas wrapped around warm cinnamon apples hit that sweet spot between pie night and a fast dessert you can pull off without turning on the oven. The filling stays soft and glossy, the shell shatters a little when you bite in, and the cinnamon sugar on the outside gives every edge a sandy crunch. Served warm with vanilla ice cream, they land like a cross between apple pie, churros, and a hand-held turnover.
What makes this version work is keeping the filling thick enough to stay put inside the tortilla. Apples release a lot of juice as they cook, so the cornstarch slurry goes in only after the fruit has softened and the liquid has had a chance to develop some body. That keeps the tortillas from going soggy before they hit the skillet. Rolling them tightly and frying them seam-side down first helps them stay closed while the filling heats through.
Below, I’ve included the one detail that matters most if you want a crisp shell instead of a greasy one, plus a few smart swaps if you’re working with different apples or need to prep ahead.
The filling thickened up just enough to stay inside the tortillas, and frying them seam-side down kept every one sealed. Mine came out crisp all the way around, and the ice cream on top was the perfect finish.
Save these apple pie tortillas for the nights when you want crispy cinnamon apples and ice cream without making a whole pie.
The Part That Keeps the Tortillas Crisp Instead of Soggy
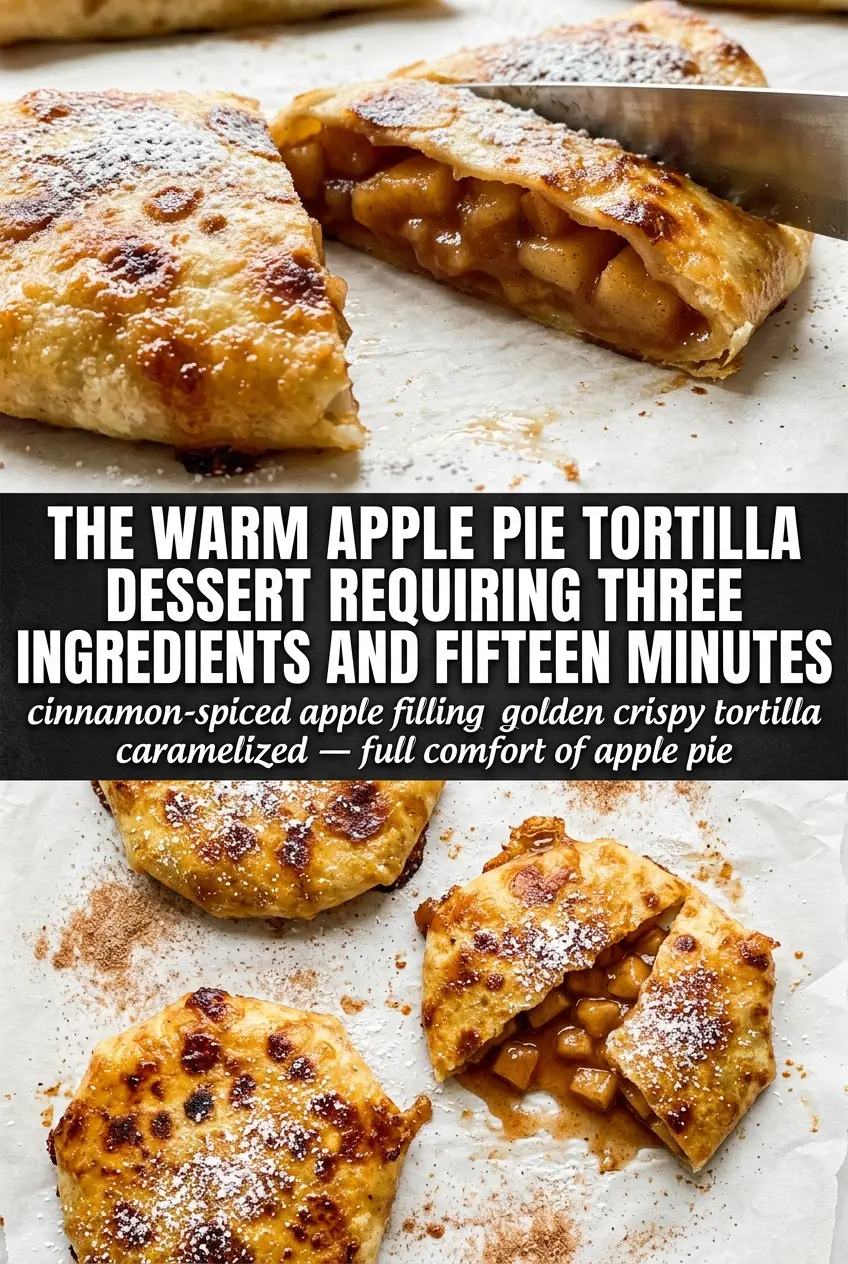
The biggest mistake here is spooning in apples that still have a puddle of syrup under them. Tortillas don’t have much structure, so any loose liquid turns the inside steamy before the outside can crisp. The goal is a filling that mounds on the spoon and holds its shape for a few seconds before settling.
That’s why the apples cook first, before the thickener goes in. You want the fruit tender and the pan juices bubbling, then the cornstarch slurry tightens everything into a glossy filling. If the mixture still looks loose after a minute or two, keep cooking it; the filling should look like pie filling, not apple soup.
- Apples — A firm, baking-friendly apple holds its shape better than a soft eating apple. If all you have are sweeter apples, they’ll still work, but the filling will be softer and a little less defined.
- Butter — This carries the cinnamon and nutmeg and gives the filling that pie-like richness. Margarine will work in a pinch, but the flavor gets flatter.
- Cornstarch — This is what turns the apple juices into a filling that stays inside the tortilla. Stir it into cold water first so it disperses evenly instead of clumping.
- Flour tortillas — Small tortillas are easiest to roll tightly and fry evenly. Bigger tortillas can work, but they need a little more filling and a longer fry time.
- Cinnamon sugar — Roll the tortillas in it while they’re still hot from the oil. If you wait, the coating won’t stick as well and you’ll lose that crisp, sugary shell.
What Each Ingredient Is Actually Doing in Apple Pie Tortillas
- Protein (quality, proper thickness) — Good quality protein tastes better. Even thickness ensures even cooking.
- Seasoning (bold, distributed throughout) — Don’t be shy with salt and pepper. Quality seasoning elevates everything.
- Oil or fat (protective and flavorful) — The fat helps develop crust and carries flavors. Use generously.
- Heat management (appropriate temperature for the protein) — Too high and the outside burns before the inside cooks. Too low and it steams.
- Technique (sear, then finish based on thickness) — Proper technique creates flavor. Sear for crust, then cook through gently.
- Aromatics and seasonings (garlic, herbs, spices) — These add complexity and depth. Distribute them throughout the cooking process.
- Resting time (let it rest before serving) — Resting allows juices to reabsorb. This keeps the protein moist and tender.
- Optional: finishing sauce or glaze — A light sauce adds richness without overwhelming. Apply at the very end.
Frying, Rolling, and Coating Without Losing the Filling
Cooking the Apples Down
Melt the butter first, then add the diced apples, brown sugar, cinnamon, and nutmeg. Cook until the apples look tender around the edges but still hold some shape; you don’t want applesauce here. If the pan starts looking dry before the apples soften, lower the heat rather than adding extra liquid, since the apples will release more as they cook.
Thickening to a Spoonable Filling
Stir the cornstarch and water together before adding it to the skillet. Once it goes in, the filling should turn glossy and begin to cling to the fruit within a minute or so. If it stays thin, keep cooking gently; cornstarch needs a brief simmer to activate, and rushing this stage is how you end up with leaks.
Rolling the Tortillas Tight
Spoon just 2 to 3 tablespoons of filling into the center of each tortilla. Roll firmly without overfilling, and secure the seam with toothpicks so the tortillas don’t open in the oil. Too much filling makes the ends burst, and that’s the fastest path to a messy skillet.
Frying to a Deep Golden Finish
Heat the oil over medium heat and fry the tortillas seam-side down first. You’re looking for a steady sizzle, not aggressive bubbling; if the oil is too hot, the outside will brown before the tortilla crisps through. Fry until both sides are deep golden and the shell feels firm, then move them straight to the cinnamon sugar while they’re still hot enough to grab the coating.
Baked Apple Pie Tortillas
Brush the rolled tortillas with melted butter, then bake them on a lined sheet until crisp and lightly browned. You won’t get the same shattering shell as frying, but you will get a lighter finish with less cleanup. A final dusting of cinnamon sugar right out of the oven helps the coating stick.
Dairy-Free Version
Use plant-based butter in the filling and serve with a dairy-free vanilla ice cream. The texture stays the same, and the cinnamon apple flavor still comes through clearly. Just check that your tortillas are made without dairy if that matters for your table.
Gluten-Free Swaps
Use certified gluten-free tortillas and confirm your cinnamon sugar and vanilla ice cream are gluten-free. The filling itself is naturally gluten-free, so the tortilla swap is what matters most. Gluten-free tortillas can be a little more fragile, so roll them gently and fry in a touch less filling per tortilla.
Make-Ahead Filling
The apple filling can be made a day ahead and chilled. Rewarm it before filling the tortillas so it spreads easily and doesn’t tear the shells. Cold filling can be thick and stubborn, which makes rolling harder than it needs to be.
Storage and Reheating
- Refrigerator: Store leftovers in an airtight container for up to 2 days. The shells soften a bit in the fridge, but the flavor stays good.
- Freezer: Freeze the filled, unfried tortillas on a tray, then transfer to a bag for up to 1 month. Fry them from frozen or thaw just enough to handle them; freezing already-fried tortillas usually leaves them limp when reheated.
- Reheating: Reheat in a skillet over medium-low heat or in a 375°F oven until crisp again. The common mistake is microwaving them, which makes the tortilla chewy and the sugar topping wet.
Answers to the Questions Worth Asking
Apple Pie Tortillas
Ingredients
Equipment
Method
- Melt butter in a skillet over medium heat, then add diced apples, brown sugar, cinnamon, and nutmeg.
- Cook for 5-7 minutes, stirring occasionally, until apples are tender and glossy.
- Mix cornstarch with water, then add it to the skillet and cook until the juices thicken and lightly cling to the apples (about 30-60 seconds).
- Place 2-3 tablespoons of apple filling in the center of each tortilla.
- Roll tortillas tightly around the filling and secure with toothpicks to keep the seam closed.
- Heat oil in a skillet over medium heat until shimmering, then fry rolled tortillas for 2-3 minutes per side until golden and crispy.
- Remove immediately and roll in cinnamon sugar while still hot so the coating sticks.
- Serve warm apple pie tortillas with vanilla ice cream alongside for melting over the filling.