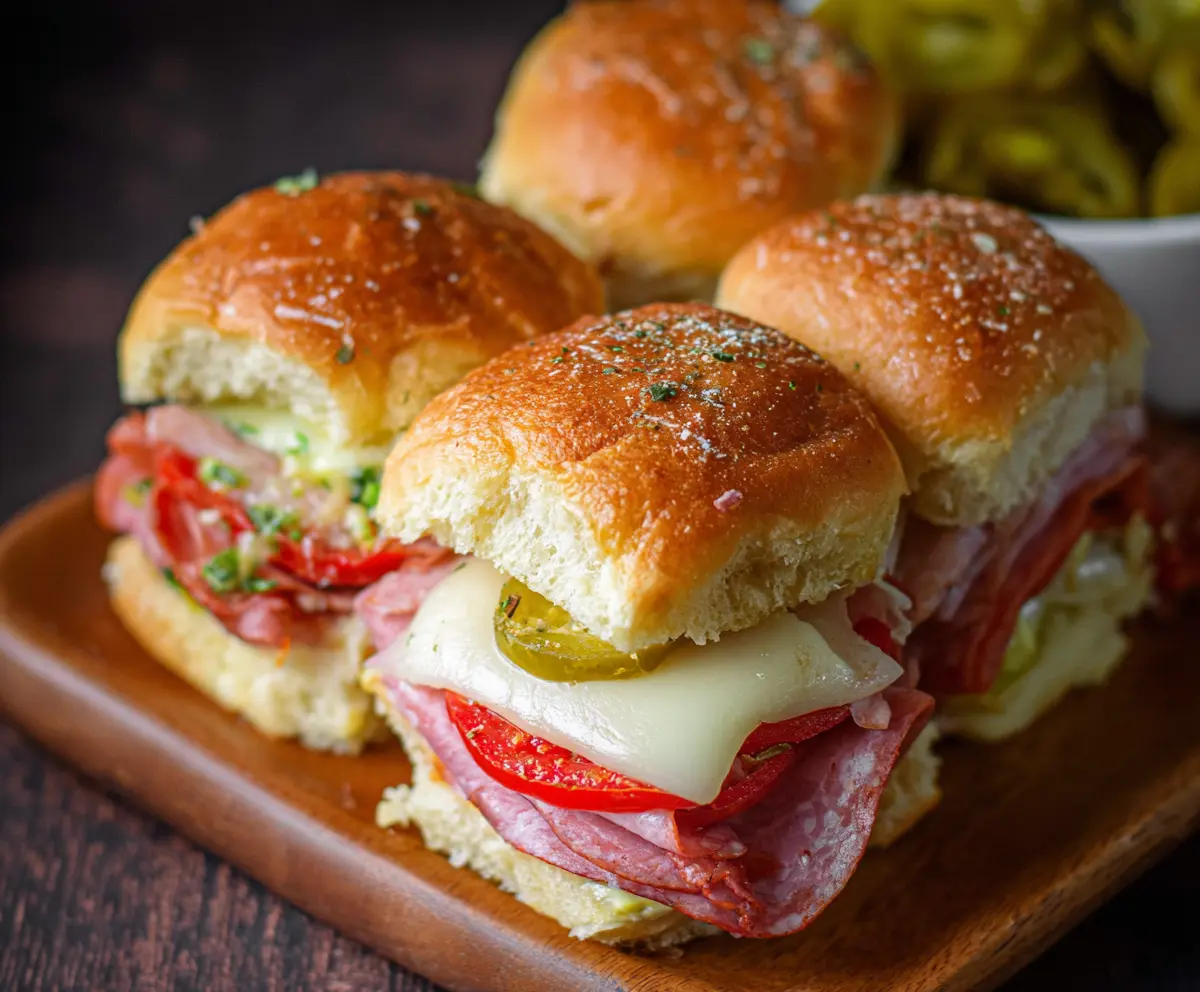
Hot Italian Sub Sliders are tiny sandwiches packed with tasty layers of meats and melted cheese. Imagine all that deliciousness wrapped in a soft, warm roll—what’s not to love?
These little bites are perfect for sharing at parties or just enjoying during a cozy night in. I find it hard to stop at one, so don’t say I didn’t warn you! 😄
Making these sliders is super easy. Just pile on your favorite Italian meats, add some cheese, and bake until golden. They turn out so gooey and cheesy! Yum!
Key Ingredients & Substitutions
Slider Buns: I recommend using Hawaiian rolls for their sweetness and soft texture. If you want a more traditional taste, try potato buns or regular slider buns as an alternative.
Deli Meats: A mix of ham, salami, and pepperoni gives a great flavor combo. You can use turkey or chicken for a lighter option, or go vegetarian with roasted veggies or marinated artichokes.
Provolone Cheese: This cheese melts beautifully! If you can’t find it, mozzarella is an excellent substitute, or pepper jack if you enjoy a bit of heat.
Tomato: I love fresh tomato slices for a juicy burst. If tomatoes are out of season, you could use sun-dried tomatoes for a concentrated flavor.
Pickled Jalapeños: They add a tasty kick! Skip them or replace them with banana peppers if you prefer less heat or want a milder flavor.
How Do I Get the Perfect Melted Cheese?
The key to perfectly melted cheese in these sliders is the baking time and temperature. Preheat your oven to 350°F so the cheese melts evenly without burning the buns.
- Once the sliders are assembled, cover them tightly with foil for the first part of baking.
- Bake for 10-15 minutes, then remove the foil to allow the tops to crisp up.
- Check the sliders around 15 minutes; they should be golden and the cheese oozy. Don’t overbake, or the buns may get too hard!
Using these tips will help you achieve that gooey, cheesy goodness every time! Enjoy your sliders! 🥪

Hot Italian Sub Sliders
Ingredients You’ll Need:
For The Sliders:
- 12 slider buns or Hawaiian rolls
- 6 slices deli ham, folded and halved
- 6 slices genoa salami, folded and halved
- 6 slices pepperoni, halved
- 6 slices provolone cheese
- 1 medium tomato, thinly sliced
- Pickled jalapeño slices (to taste)
For The Spreads and Toppings:
- 1/2 cup mayonnaise
- 1 tablespoon yellow mustard
- 2 tablespoons unsalted butter, melted
- 1 teaspoon dried oregano
- 1/2 teaspoon garlic powder
- Grated Parmesan cheese (for topping)
- Chopped fresh parsley (optional, for garnish)
How Much Time Will You Need?
This recipe takes approximately 10 minutes for preparation and about 15-20 minutes for baking. So, in total, you’ll spend around 30-35 minutes to create these warm, cheesy sliders that are sure to impress!
Step-by-Step Instructions:
1. Preheat the Oven:
Start by preheating your oven to 350°F (175°C). This ensures your sliders will bake perfectly and melt beautifully!
2. Prepare the Slider Buns:
Carefully slice the slider buns horizontally, leaving them connected if you can. This makes it super simple to fill and bake.
3. Mix the Spreads:
In a small bowl, combine the mayonnaise and yellow mustard. Spread this tasty mixture evenly on the inside bottom halves of the buns to give them a flavor boost!
4. Layer the Meats:
Now, it’s time to layer! Start with deli ham, followed by genoa salami, and finish with pepperoni. Just evenly distribute them for the best bites!
5. Add the Fresh Ingredients:
Place thinly sliced tomato over the meats for a juicy touch. Then add a slice of provolone cheese on each section to seal in all the yumminess.
6. Spice It Up:
If you like a little heat, sprinkle pickled jalapeño slices over the cheese according to your taste!
7. Top It Off:
Place the top halves of the buns over the fillings, like a cozy lid on your delicious sandwich!
8. Prepare the Butter Mixture:
In a separate small bowl, mix together melted butter, dried oregano, and garlic powder. This will give your sliders a tasty finish!
9. Brush the Sliders:
Generously brush the butter mixture over the tops of the buns, making sure every little part gets some love.
10. Add Parmesan:
Sprinkle some grated Parmesan cheese on top for extra flavor! It will melt nicely and create a golden crust.
11. Bake the Sliders:
Arrange the assembled sliders on a baking sheet or in a suitable baking dish. Bake in your preheated oven for about 15-20 minutes or until the cheese is melted and the tops are looking golden and crispy!
12. Cool and Garnish:
Once they’re done, remove the sliders from the oven and let them cool slightly. If you like, sprinkle fresh parsley on top for a pop of color!
13. Slice and Serve:
Carefully separate the sliders and serve them warm. They are perfect alongside pickles or your favorite side dishes.
Enjoy these delicious, gooey Hot Italian Sub Sliders—perfect for game day, parties, or any time you want a satisfying mini sandwich! Happy eating! 🥪
Can I Use Different Meats?
Absolutely! While ham, salami, and pepperoni are traditional, feel free to mix it up with turkey, roast beef, or even a vegetarian option like marinated vegetables or grilled mushrooms for a delicious twist!
How Do I Store Leftovers?
Any leftover sliders can be stored in an airtight container in the fridge for up to 3 days. To reheat, wrap them in foil and warm them in the oven at 350°F (175°C) until heated through, or pop them in the microwave for a quick option.
Can I Make These Sliders in Advance?
Yes! You can assemble the sliders a few hours ahead of time, cover them tightly with foil, and keep them in the fridge until you’re ready to bake. Just add a few extra minutes of baking time if they’re coming straight from the fridge!
What Can I Serve with Hot Italian Sub Sliders?
These sliders pair perfectly with a simple salad, potato wedges, or some crispy chips. You could even serve them with a side of marinara sauce for dipping—yummy!